Schedules
The Schedules page allows you to manage automated discovery scan schedules across your Asset Gateways. A schedule defines when a discovery scan runs, which Asset Gateway and Asset link it uses, and optional scan parameters such as IP filters and an access group.
Schedules page overview
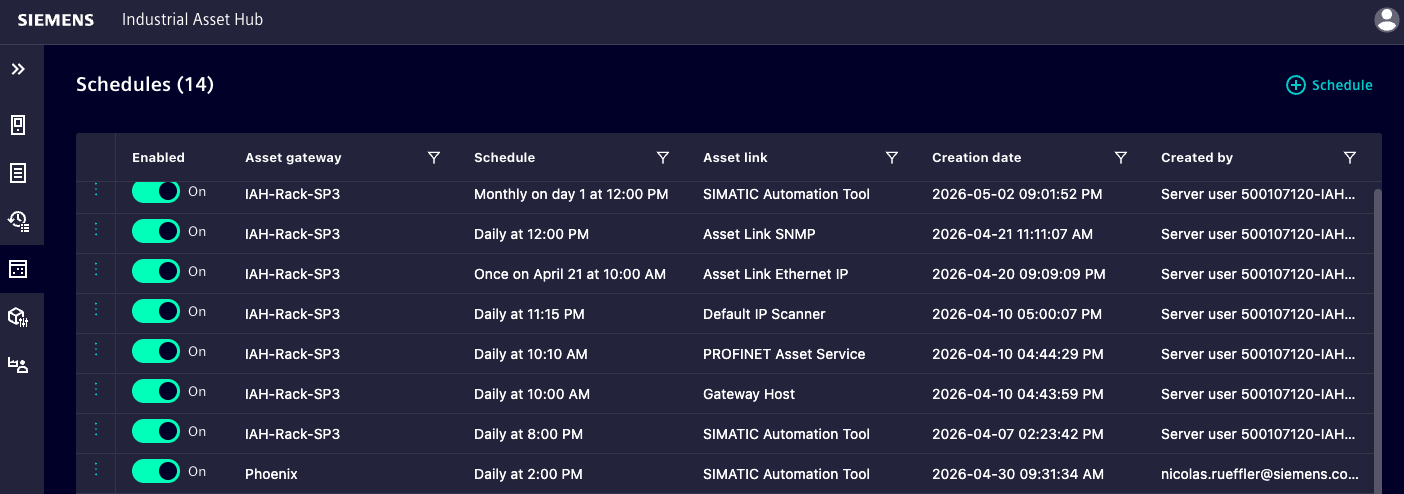
Figure: Schedules page
The Schedules page lists all schedules across all Asset Gateways. The page header shows the total number of schedules currently configured.
The table contains the following columns:
| Column | Description |
|---|---|
| Enabled | Toggle to enable or disable the schedule without deleting it. |
| Asset gateway | Name of the Asset Gateway the schedule runs on. |
| Schedule | Human-readable description of when the scan runs, shown in your local timezone. |
| Asset link | The Asset link (discovery configuration) used by the scan. |
| Creation date | Date the schedule was created. |
| Created by | The user who created the schedule. |
Customize the Schedules view
Every column on the Schedules page can be sorted and filtered.
Sort a column by clicking on the column header. An arrow marks the sorted column. Click on it to switch between descending and ascending order.
Filter a column by clicking the filter icon in the column header, then selecting a filter criterion and entering a value.
Create a schedule
Creating a schedule is a two-step process completed in a dialog.
Select Schedule on the Schedules page to open the dialog.
Step 1: Configure the schedule timing
Choose the frequency at which the schedule recurs.
| Frequency | What to configure |
|---|---|
| Hourly | Minute of the hour the scan starts (0-59). |
| Daily | Time of day the scan starts. |
| Weekly | Day of the week and time of day. |
| Monthly | Day of the month (1-31) and time of day. |
| Yearly | Date and time of that day. |
| Custom | A 5-field cron expression in the format minute hour day month day-of-week. |
All times are entered and displayed in your local browser timezone. The schedule is stored internally in UTC.
Select Next to continue to Step 2.
Step 2: Configure the scan settings
| Field | Description |
|---|---|
| Asset gateway | Select the Asset Gateway to run the scan on. Required. |
| Asset link | Select the Asset link (discovery configuration) to use. The list is filtered to Asset links available on the selected gateway. Required. |
| IP filter | Define IP address ranges to include or exclude. Required for SNMP, Default IP Scanner, and Shelly Asset links; optional for SAT Asset links. Not shown for Asset links that do not support IP filtering. |
| Access group | Enter an access group name (1-80 characters) to assign newly discovered assets to that access group. Optional. |
Select Create to save the schedule. The new schedule appears in the Schedules list and runs at the next scheduled time.
Note
The Asset Gateway must be online for the scheduled scan to start.
Edit a schedule
- Click the context menu (three dots) on the left of the schedule row.
- Select Edit.
- Modify the schedule timing in Step 1 or the scan settings in Step 2.
- Select Save.
Note
The Asset Gateway cannot be changed when editing an existing schedule.
Enable or disable a schedule
Use the toggle in the Enabled column to pause or resume a schedule without deleting it.
- When enabled, the schedule runs at its next configured time.
- When disabled, the schedule is skipped until it is enabled again.
Delete a schedule
- Click the context menu (three dots) on the left of the schedule row.
- Select Delete.
- In the Delete dialog, review the gateway name and schedule shown.
- Select the confirmation checkbox to confirm that the schedule will be permanently deleted.
- Select Delete.
Deleting a schedule does not affect assets that were already discovered by previous scans.